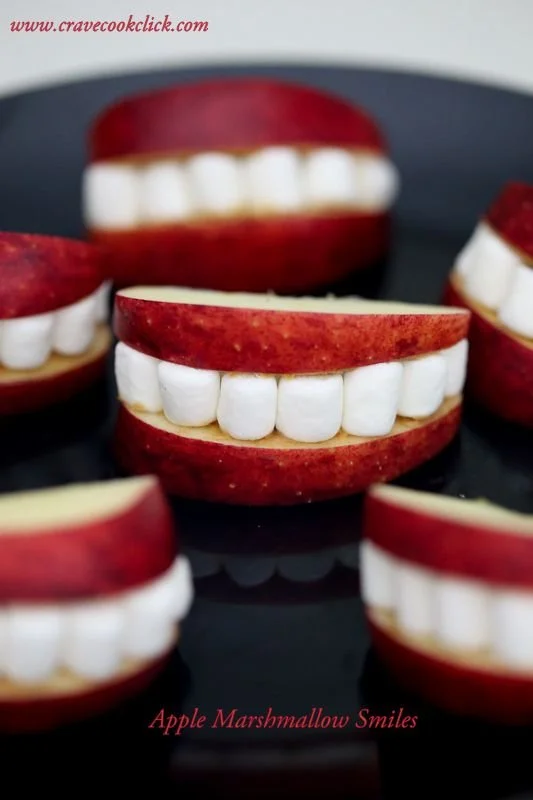
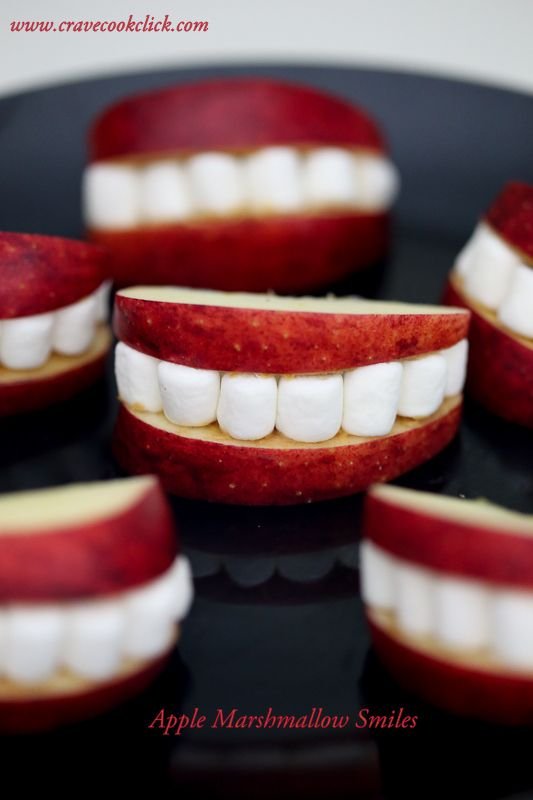
Apple Marshmallow Smiles are a fun and easy snack that kids and adults alike will enjoy. This simple recipe is perfect for a quick pick-me-up or as a playful addition to lunchboxes. With just a few ingredients, you can create adorable apple slices that are not only delicious but also a hit with everyone.
Why You’ll Love Apple Marshmallow Smiles
- Kid-Friendly Fun: This recipe turns ordinary apple slices into playful “smiling” faces, making them a hit for snacks and parties. Kids can even help assemble their apple smiles!
- Healthy Choice: With fresh apples as the base, you get a nutritious snack that’s naturally sweet and packed with vitamins.
- Quick and Easy: Ready in just a few minutes, this recipe is perfect for when you need a quick snack or dessert without extensive prep.
- Versatile Snack: Customize the toppings based on your preferences. Use different types of nut butter or add other fun toppings.
- No Cooking Required: Since there’s no baking or cooking involved, it’s a great way for children to get involved in the kitchen safely.
Recipe Overview
- Prep Time: 10 minutes
- Cook Time: 0 minutes
- Total Time: 10 minutes
- Servings: 4
- Difficulty Level: Easy
Ingredients You’ll Need for Apple Marshmallow Smiles
- Apples: 2 medium apples (any variety you like; tart types like Granny Smith add a nice contrast to the sweetness of the toppings).
- Marshmallows: 1 cup mini marshmallows (these create the “smile” and add sweetness).
- Chocolate Chips: 1/4 cup mini chocolate chips (use these for the eyes).
- Peanut Butter (optional): 1/4 cup (smooth or crunchy, it adds a creamy texture).
- Cinnamon (optional): 1 teaspoon (for an extra layer of flavor).
How to Make Apple Marshmallow Smiles
- Slice the Apples: Cut the apples into wedges, about 1-inch thick. Make sure to remove any seeds and core.
- Spread Peanut Butter: Take a wedge and spread a thin layer of peanut butter on one side. This will help the marshmallows stick.
- Add Marshmallows: Place several mini marshmallows on top of the peanut butter, creating a “smile” shape.
- Create Eyes: Use two mini chocolate chips and place them on the marshmallows to represent eyes.
- Optional Flavor Boost: If desired, sprinkle a little cinnamon over the marshmallows for added flavor.
- Serve and Enjoy: Present your cheerful apple smiles on a plate and enjoy!
Tips for Success
- Choose Firm Apples: Select crisp apples that hold their shape well, ensuring they don’t get mushy when sliced.
- Use Fresh Ingredients: For the best flavor, make sure your marshmallows and peanut butter are fresh.
- Experiment with Nut Butters: If peanut allergies are a concern, try almond butter, sunflower seed butter, or omit it entirely.
- Cut the Apples Just Before Serving: Apples brown quickly, so slice them right before serving to keep them looking fresh.
- Don’t Overload the Toppings: Use just the right amount of marshmallows and chocolate chips to keep the smiles balanced and not overly sweet.
Easy Variations
- Fruit Swaps: Substitute apples with pear or banana slices for a different flavor and texture.
- Nut-Free Option: Replace peanut butter with Greek yogurt or omit it altogether for a nut-free treat.
- Spicy Twist: Add a pinch of cayenne or chili powder to the peanut butter for a spicy kick.
- Dairy-Free: Use dairy-free chocolate chips and nut butters to cater to dietary preferences.
- Add-In Options: Sprinkle chopped nuts or granola over the marshmallows for an added crunch.
What to Serve with Apple Marshmallow Smiles
- Yogurt: Pair these apple smiles with a side of yogurt for a creamy dip; this adds protein and makes the snack more filling.
- Cheese: Serve with small cheese cubes, such as cheddar or mozzarella, for a savory balance to the sweetness.
- Granola Bars: Offer a granola bar as a crunchy side for texture contrast.
- Trail Mix: Serve with a handful of trail mix for a satisfying snack mix that combines sweet and salty flavors.
- Vegetable Sticks: Pair with carrot or celery sticks for a simple veggie accompaniment.
Storage and Reheating
- Refrigeration: These apple smiles are best enjoyed fresh but can be stored in an airtight container in the refrigerator for up to 1 day.
- Freezing: Freezing is not recommended since the texture of apples can change after being frozen and thawed.
- Prevent Browning: To keep apples from browning before serving, sprinkle them with a bit of lemon juice.
- Meal Prep Note: If meal prepping, consider slicing the apples and storing them in water with lemon juice until you’re ready to assemble.
Common Mistakes to Avoid
- Using Overripe Apples: Ripe apples can become mushy and lose their shape; choose firm ones.
- Too Much Peanut Butter: Applying too much peanut butter can make the smiles difficult to eat and overly sweet.
- Delayed Assembly: Assembling too far ahead of serving can cause the apples to brown and the marshmallows to get stale; prepare them close to serving time.
- Skipping the Core Removal: Not removing the core may lead to biting into seeds, which can be unpleasant.
- Not Customizing: Not experimenting with different toppings can limit the fun; feel free to get creative with your toppings.
Apple Marshmallow Smiles: Background & Cultural Inspiration
Apple Marshmallow Smiles fit perfectly into playful culinary traditions where food and fun intersect. Inspired by various children’s snacks that appeal to creativity, these sweet treats remind us that food can be enjoyable and educational. The combination of healthy fruits with sweet elements like marshmallows and chocolate taps into a broader tradition of using apples in desserts and snacks, celebrated in many cultures. By encouraging kids to participate in the kitchen, this recipe embraces the idea that cooking can be a delightful experience filled with laughter and learning.
Frequently Asked Questions
Can I use different fruits instead of apples?
Absolutely! Pears and bananas work well too. Just ensure the fruit is firm enough to hold up under the toppings.
How long do leftovers last in the fridge?
These apple smiles are best eaten fresh, but if stored properly in an airtight container in the fridge, they can last about one day.
Can I prepare these ahead of time?
While you can slice the apples ahead, it’s best to assemble the smiles just before serving to keep everything fresh and crunchy.
Is there a way to make them sweeter?
You can drizzle honey or maple syrup over the top or increase the number of marshmallows and chocolate chips used.
What should I do if the apples brown?
To prevent browning, sprinkle them lightly with lemon juice as you slice them, or prepare them right before serving.
Final Thoughts
Apple Marshmallow Smiles are not only a delightful, quick snack but also an opportunity for creativity in the kitchen. With their playful presentation and simplicity, they bring joy to both children and adults. This recipe is worth trying, whether for an after-school treat, a fun party addition, or simply to add some smiles to your day. Enjoy making these little smiles with your loved ones!
PrintApple Marshmallow Smiles
A fun and easy snack that turns ordinary apple slices into adorable smiles, perfect for kids and adults alike.
- Prep Time: 10 minutes
- Cook Time: 0 minutes
- Total Time: 10 minutes
- Yield: 4 servings
- Category: Snack
- Method: No Cooking Required
- Cuisine: American
- Diet: Vegetarian
Ingredients
- 2 medium apples (any variety)
- 1 cup mini marshmallows
- 1/4 cup mini chocolate chips
- 1/4 cup peanut butter (optional)
- 1 teaspoon cinnamon (optional)
Instructions
- Slice the apples into wedges, about 1-inch thick.
- Spread a thin layer of peanut butter on one side of the apple wedge.
- Add mini marshmallows on top of the peanut butter, creating a smile shape.
- Create eyes using two mini chocolate chips placed on the marshmallows.
- Optional: Sprinkle cinnamon over the marshmallows for added flavor.
- Serve and enjoy your cheerful apple smiles!
Notes
Choose firm apples to ensure they hold their shape and use fresh ingredients for the best flavor.